
Description
Based off the Holiday Pusheen Surprise Blind Box design, this festive Pusheen the Cat bento is made using naturally dyed rice & eggs, and easily shaped using a rice mold. Plus, a bonus recipe teaches you how to easily make naturally dyed egg crepes. {Vegetarian}
Ingredients
Food Items:
- ~1/2 cup cooked Japanese short-grain rice
- 2 – 3 tablespoons finely ground black sesame seeds
- Nori seaweed
- 1/4 red bell pepper
- 1 slice white cheese
- 1/4 yellow egg crepe (recipe can be found HERE)
- 1 thick slice cucumber
- 1 fried spaghetti noodle
- 2 eggs
- 1/4 teaspoon spirulina powder (can substitute matcha powder or spinach powder)
- 1 teaspoon cornstarch
Recommended Tools:
- Triangle onigiri mold
- Cat face nori punch
- Circle cutter pen tool
- Food cutter wheels set (yellow wheel)
- Heart shaped cookie cutter (optional; can use a craft or paring knife instead)
- Yellow star food pick
- Plastic wrap
Instructions
Dyed Egg Crepe:
- Take your 2 eggs and separate the whites from the yolks. Add the whites to a small bowl and discard the egg yolks. (Alternatively, use the egg yolks to make the yellow egg crepe needed later on in this recipe!)
- In a separate bowl, mix together cornstarch with 1 tablespoon of water. Add the cornstarch slurry to the egg whites.
- Add spirulina to the egg white mixture, and whisk together until everything is fully mixed. Optional: Strain the egg mixture through a fine-meshed strainer – this results in a smoother egg crepe.
- Heat a small non-stick pan over medium-low heat. Add the egg mixture, and swirl to coat the bottom of the pan. Cover pan with lid and allow the egg crepe to fully cook. Remove carefully with a spatula and allow to cool.
Dying & Molding the Rice:
- Add ground black sesame seeds to warm rice and mix until evenly colored. Feel free to add more ground black sesame if you’d like a darker grey color.
- With a damp paper towel, wipe the inside of your onigiri mold until it’s completely damp. Fill the mold with the grey rice until it’s 3/4 full, then insert the removable top piece and push until it’s fully inserted into the mold. Remove the top piece and flip the rice mold over, making sure to do this over top a sheet of plastic wrap. If your rice mold has little push indents on the bottom, push it gently with your thumb, then gently tap the bottom and sides of the mold until the onigiri slides out. Wrap fully in plastic wrap.
- Using your pinky finger, gently press it down into the pointy end of the onigiri, and rub your finger back and forth until an indent forms – this is the beginning of Pusheen’s ears. Use your index finger and thumb to “pinch & pull” at the two ears, until they start to become pointy and well defined. Smooth out and elongate the rest of the body with your hands and fingers, pressing down and rubbing as necessary. Be careful not to squish the body as you shape the ears; you want to maintain the rounded triangle shape as much as possible.
Decorations:
- Using the cat face nori punch, punch out the full design from the nori. Reserve the eyes and mouth/nose piece, and discard the other pieces.
- Optional: Take the nori nose/mouth piece, and, with scissors, carefully cut off both sides of the nose, until you are left with only a straight line sticking up from the mouth.
- Using the circle cutter pen tool (larger side), cut out circles from the red pepper, yellow egg crepe, and white cheese. Based off Christmas Tree Pusheen’s design, you will need 2 yellow circles, 3 red circles, and 3 white circles, but feel free to do more or less.
- With a small knife, cut out 3 long rectangular strips from the turquoise-dyed egg crepe; the strips should be long enough to wrap around the grey rice Pusheen body, and approximately 1.5 cm in width (this will, of course, depend on the size of Pusheen’s body, but use this measurement as a starting point).
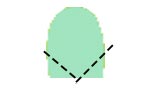
- Using the pointy end of the heart cookie cutter, cut out a continuous line of triangles across the bottom edge of each egg crepe strip – these will become the Christmas tree branches that cover Pusheen’s body. Use the diagram below as a reference for the cutting pattern.

- Using the long petal-shaped cutter located in the very middle of the yellow food cutter wheel, use the rounded end to cut out a “treetop” from the cucumber slice. This will become the “hat” that Christmas Tree Pusheen wears that looks like the top of the Christmas tree.
- Place the cucumber cutout on top of a leftover piece of turquoise-dyed egg crepe, and, using a craft knife or paring knife, cut around the cucumber to create a piece of egg crepe that matches it in size and shape. Basically, you’re using the cucumber cutout as a trace for the dyed egg crepe. Reserve both pieces for later.
- Using a craft knife or pairing knife, cut off the two pointy ends of the cucumber/egg treetop – this ensures the treetop fits snugly on top of Pusheen’s head and in between her ears. Follow the cutting outline in the diagram below.
Assembly:
- Take the yellow star food pick and insert it into the rounded end of the cucumber “treetop”. Then, insert the treetop right in between rice Pusheen’s ears. Use tweezers to add the dyed egg crepe piece on top of the cucumber.
- Using clean hands, wrap the dyed egg crepe “tree branches” around the Pusheen rice body, starting with the one at the very bottom and working your way up. The branches should overlap slightly. Tuck the loose ends underneath the Pusheen rice body so that the branches stay in place.
- Using tweezers, add the nori facial features (eyes & nose/mouth) to Pusheen’s face.
- Using tweezers, add the red, yellow, and white circles onto the egg crepe tree branches, using a bit of honey or mayo to help them stick better (if desired). Based on Christmas Tree Pusheen’s design, you should add 2 circles to the top branch, and 3 circles each to the middle and bottom branches.
- Take the fried spaghetti noodle and break off 4 small pieces – these will become Pusheen’s whiskers. Carefully push them into both sides of Pusheen’s face (2 on each side).
Notes
- To help the nori facial features stand out better against the grey rice, place them on top of white cheese and cut around them using a craft knife or paring knife, until you’re left with a small white cheese border around the nori pieces. Apply them as you normally would to Pusheen’s face, using a bit of honey or mayo to help them stick better.
- When packing Christmas Tree Pusheen into a bento box, use filler foods such as steamed broccoli and/or cherry tomatoes to help keep the egg crepe branches in place.

Share This Bento!
Spread the bento love to your friends & family ~