Description
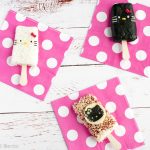
Learn how to make Hello Kitty Rice Popsicles using a standard popsicle mold – no hands necessary! They make the perfect summer treat, and come in 3 delicious “flavors”.
Ingredients
Food Items:
- Japanese short-grain rice, cooked
- Nori seaweed
- White cheese (such as provolone, swiss, or white Kraft Singles)
- Corn kernals (I used frozen)
- Honey or mayonnaise
“Strawberry Crunch” Coating:
- 1/4 cup toasted Panko breadcrumbs
- 1-2 tablespoons Korean red pepper flakes (gochugaru)
Recommended Tools:
- Popsicle Mold
- Wooden popsicle sticks
- Cat nori punch
- Cat food cutter
- Circle cookie or food cutter (mine was around 2 inches)
- Red bow food picks
- Plastic wrap
- Non-stick spray (optional)
Instructions
Assembly:
- Coat your popsicle mold in non-stick spray, or else a bit of water, to prevent the rice from sticking to the sides.
- Fill your popsicle mold with warm rice, making sure to press down firmly with the back of a rice paddle or spoon to ensure all the crevices are filled and packed with rice. The firmer the rice is packed, the better your popsicles will stay together.
- Flip over the popsicle mold and gently tap the base until the rice popsicles slide out. I recommend doing this over top a flat surface covered in plastic wrap.
- Carefully wrap each individual popsicle in plastic wrap, and store in the fridge until ready to decorate.
Decorating:
Classic Hello Kitty Popsicle:
- Cut out 2 nori eyes and 6 nori whiskers with a cat nori punch.
- Cut the rounded tip off of a corn kernal for the nose.
- Using tweezers, apply the nori facial features to one of your rice popsicles.
- Using tweezers, dip the cut end of the corn kernal into a little bit of honey or mayo, and place onto the rice popsicle. Alternatively, you could break off a tiny piece of uncooked spaghetti, insert it into the cut end of the corn, then push it into the rice popsicle like a thumbtack. The spaghetti will eventually become soft enough to eat from the moisture of the rice.
- Stick the red bow food pick into the rice popsicle, just slightly above one of the nori eyes.
- Stick a wooden popsicle stick into the base of your popsicle, wiggling it gently so as not to break the shape.
“Chocolate-Dipped” Hello Kitty Popsicle:
- Cut out 2 white cheese eyes with a small-holed drinking straw or food cutter, and 6 white cheese whiskers with a cat food cutter.
- Cut the rounded tip off of a corn kernal for the nose.
- Cut out a square piece of nori that is slightly bigger than the size of your rice popsicle. With scissors, cut small slits all around the edges of the nori.
- Place your nori on a flat surface, then, carefully, place one of your rice popsicles on top of the nori square, right in the middle.
- Using your hands, carefully wrap your rice popsicle in the nori (like you’re wrapping a present!). Try your best to make the nori wrap as smooth as possible, but don’t worry if you have a few bumps or rough edges.
- When finished wrapping, cover entire popsicle firmly in plastic wrap– this will help the nori adhere to the rice better, making it appear smoother. Allow to rest in the fridge for a minimum of 10 minutes.
- (After resting) Apply the cheese facial features to rice popsicle using tweezers. Dipping them in honey or mayo beforehand will help them to stick to the nori better.
- Using tweezers, dip the cut end of the corn kernal into a little bit of honey or mayo, and place onto the rice popsicle. Alternatively, you could break off a tiny piece of uncooked spaghetti, insert it into the cut end of the corn, then push it into the rice popsicle like a thumbtack. The spaghetti will eventually become soft enough to eat from the moisture of the rice.
- Stick the red bow food pick into the rice popsicle, just slightly above one of the cheese eyes.
- Stick a wooden popsicle stick into the base of your popsicle, wiggling it gently so as not to break the shape.
“Strawberry Crunch” Hello Kitty Popsicle:
- To make the “strawberry crunch” coating, mix together toasted Panko breadcumbs and Korean red pepper flakes in a small bowl. Set aside.
- To make the “white chocolate medallion”, cut out a circle (approximately 2-inches) with circle cookie cutter from white cheese.
- Apply your choice of nori design on top of the cheese circle (see Notes for ideas). Use a little bit of honey or mayo to help it stick to the cheese.
- Take out one of your rice popsicles, and place on a flat surface, or in a flat-bottomed dish. Coat the popsicle in honey using a pastry brush or spoon, to make the surface sticky.
- Sprinkle your “strawberry crunch” mix all over the rice popsicle, adding more mix to any areas that are showing too much rice. Keep applying the mix until there is no more white rice showing.
- Stick a wooden popsicle stick into the base of your popsicle, wiggling it gently so as not to break the shape.
Notes
- I decorated my “white chocolate medallion” cheese circle with a pre-cut Hello Kitty nori face– it came in a pack I purchased in Japan. Since these are not readily available to those outside of Japan, I recommend decorating your cheese circle with either nori Hello Kitty facial features (just like with the Classic Hello Kitty Popsicle), or even with a cute bow, cut from red pepper, imitation crab stick (red portion), or ham. Even just a vegetable or nori heart would be adorable!
- I found that making a small incision into the base of each rice popsicle with a sharp, wet knife was helpful in getting the popsicle sticks to slide in smoothly.
- You can also make the nori eyes by using a circle nori punch, and the nori whiskers by using a punch with a straight line.


Share This Bento!
Spread the bento love to your friends & family ~