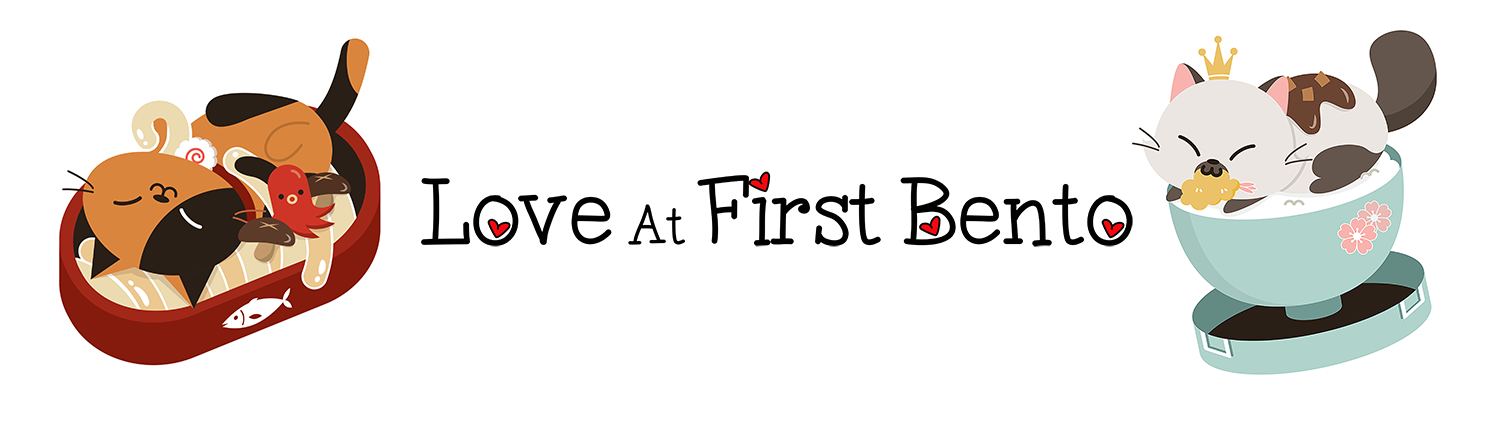
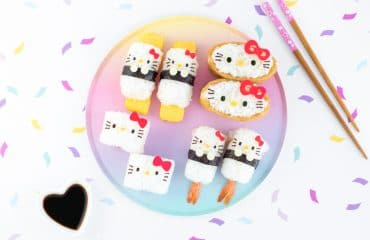
This Hello Kitty Sushi Bento is pure pink perfection! Beautify your lunch with these crazy cute, easy-to-make deco sushi rolls, which are sure to make any Hello Kitty fan swoon with glee! BONUS: An exclusive Bento&co discount for LAFB readers – find it below!
![Hello Kitty Sushi Bento - Beautify your lunch with this Hello Kitty Sushi Bento! Filled with adorable Hello Kitty sushi rolls, as well as pink gingham flower sushi rolls, this pretty bento box is an edible dream come true for any Hello Kitty fan! Find out just how easy it is to make by visiting loveatfirstbento.com [character bento, kyaraben, deco sushi]](https://loveatfirstbento.com/wp-content/uploads/2018/12/Hello-Kitty-Sushi-Bento-pinterest.jpg?x21322)
![Hello Kitty Sushi Bento - Beautify your lunch with this Hello Kitty Sushi Bento! Filled with adorable Hello Kitty sushi rolls, as well as pink gingham flower sushi rolls, this pretty bento box is an edible dream come true for any Hello Kitty fan! Find out just how easy it is to make by visiting loveatfirstbento.com [character bento, kyaraben, deco sushi]](https://loveatfirstbento.com/wp-content/uploads/2018/12/Hello-Kitty-Sushi-Bento-4.jpg?x21322)
Sushi is taken to all-new pink fantastical heights in this ultra pretty Hello Kitty Sushi Bento Box! Featuring adorable Hello Kitty sushi rolls, pink gingham flower sushi rolls, and enough pink to send any girly-girl’s heart on hiatus, this bento is the ULTIMATE lunch for any and all Hello Kitty fans. And I’ll let you in on a little secret: these sushi rolls are seriously SO easy to make. Like, if you can make sushi, then you 100% can make Hello Kitty sushi. Don’t believe me? Read on and find out why! 😉
When Bento&co sent me this gorgeous Hello Kitty gingham bento box, I knew immediately that I wanted to fill it up with three specific elements:
- Hello Kitty sushi. Because how can Hello Kitty sushi not be a good idea?
- Edible gingham patterning, to complement the gingham design on the bento box.
- Lots and lots of pink. And lots of flowers. Go big or go home, right?
![Hello Kitty Sushi Bento - Beautify your lunch with this Hello Kitty Sushi Bento! Filled with adorable Hello Kitty sushi rolls, as well as pink gingham flower sushi rolls, this pretty bento box is an edible dream come true for any Hello Kitty fan! Find out just how easy it is to make by visiting loveatfirstbento.com [character bento, kyaraben, deco sushi]](https://loveatfirstbento.com/wp-content/uploads/2018/12/Hello-Kitty-Sushi-Bento-2.jpg?x21322)
Adorable and easy enough for a bento novice to make? I know it sounds too good to be true, but hear me out. What makes these Hello Kitty sushi rolls so easy to make is the fact that you don’t have to dye any rice or make any fancy designs with the rice before you roll it up – just make some regular white sushi rice, fill it with whatever sushi fillings you’d like (I went with tamagoyaki and bell pepper strips lightly sauteed in sesame oil), roll it up, and you’re already 95% done. If you’ve never made sushi before, then check out my Candy Cane Sushi video tutorial for a great visual demonstration of making deco sushi from start to finish.
The sushi truly transforms into Hello Kitty sushi, however, with the help of a Hello Kitty nori punch, as well as a Hello Kitty food cutter wheel – both essential bento tools for any die-hard Hello Kitty fan. Use the nori punch to make some nori eyes and whiskers, the food cutter wheel to make an orange cheese nose, and a small bow cutter to make a white cheese hair bow (which I colored red using an edible food marker). Place all these elements onto the front of your sushi, and voila – you’ve got Hello Kitty sushi rolls! Prepare to be the envy of everyone.
![Hello Kitty Sushi Bento - Beautify your lunch with this Hello Kitty Sushi Bento! Filled with adorable Hello Kitty sushi rolls, as well as pink gingham flower sushi rolls, this pretty bento box is an edible dream come true for any Hello Kitty fan! Find out just how easy it is to make by visiting loveatfirstbento.com [character bento, kyaraben, deco sushi]](https://loveatfirstbento.com/wp-content/uploads/2018/12/Hello-Kitty-Sushi-Bento-1.jpg?x21322)
And, although they may not look like it, the pink gingham flower sushi rolls are just as easy to make as the Hello Kitty rolls – promise! The only extra step is dying your rice pink, which is easily accomplished with a little beet powder. Once that’s done, assemble your sushi as per usual, then brace yourself for the epic sight of perfectly pink sushi! You can, of course, serve them just like that, but I took it a step further and wrapped my pink sushi in an extra special decoration – edible pink gingham paper! I cut out thin strips of the paper using fancy wavy craft scissors, then wrapped it around each sushi roll so that it looked like a cute ribbon. Complete the look with an edible flower (optional, but super pretty), and take a moment to admire the beautiful work of sushi art you’ve just created!
I ordered my edible wafer paper from an Etsy shop called DecorEats, and was super happy with the quality & color of the product. And, since I know you’re all probably wondering what edible paper tastes like, allow me to report that this particular edible paper tasted like…. absolutely nothing. So rest assured, it will not have any negative effects on the taste of your sushi. Just think of it like extra fancy nori. In fact, you apply it to the sushi just like you would nori, and, once it adheres to the rice, it softens up and becomes easy to eat.
![Hello Kitty Sushi Bento - Beautify your lunch with this Hello Kitty Sushi Bento! Filled with adorable Hello Kitty sushi rolls, as well as pink gingham flower sushi rolls, this pretty bento box is an edible dream come true for any Hello Kitty fan! Find out just how easy it is to make by visiting loveatfirstbento.com [character bento, kyaraben, deco sushi]](https://loveatfirstbento.com/wp-content/uploads/2018/12/Hello-Kitty-Sushi-Bento-3.jpg?x21322)
Along with the sushi, I packed this vegetarian bento full of fresh raspberries & pomegranate arils (topped with some pink pearl sprinkles), a divider of pretty edible flowers, and Hello Kitty carrots, made using my favorite Hello Kitty veggie cutter tool. I found the depth of this bento box to be perfect for packing multiple rolls of sushi in, and, even when the lid was put on, the sushi didn’t get squished – a vital feature for when you’re packing up intricately designed bentos.
If you wanna get your hands on the Hello Kitty gingham bento box, tools like the Hello Kitty veggie cutters & Hello Kitty food cutter wheel, and/or all sorts of other adorable Hello Kitty bento products, then I’ve got the best news for you. I’ve teamed up with Bento&co to provide you all with an exclusive LAFB reader’s discount: 5% off your entire order from Bento&co! Either use this link to automatically activate the discount, or manually enter the code LOVEATFIRSTBENTO5 at checkout. [Discount code is valid until March 2, 2019.] Now there’s nothing holding you back from that Hello Kitty bento shopping spree!
So, if you’re on a quest for one of the prettiest lunches in the world, then look no further: this Hello Kitty Sushi Bento is your perfect match! Brimming with pretty pink Hello Kitty goodness, this bento is literally a Hello Kitty fan’s edible dream come true! And I promise, your stomach will live happily ever after, too, thanks to all that delectable sushi 😉
MORE HELLO KITTY BENTO BOXES:
- Hello Kitty Pizza Bento
- Hello Kitty Cherry Bento
- Hello Kitty Rice Popsicles
- Fall Hello Kitty Mosaic Bento
![Hello Kitty Sushi Bento - Beautify your lunch with this Hello Kitty Sushi Bento! Filled with adorable Hello Kitty sushi rolls, as well as pink gingham flower sushi rolls, this pretty bento box is an edible dream come true for any Hello Kitty fan! Find out just how easy it is to make by visiting loveatfirstbento.com [character bento, kyaraben, deco sushi]](https://loveatfirstbento.com/wp-content/uploads/2018/12/Hello-Kitty-Sushi-Bento-2-150x150.jpg?x21322)
Hello Kitty Sushi + Pink Gingham Sushi

 Yield: 8 sushi rolls
 Category: Sushi
 Cuisine: Japanese
Description
Learn just how easy it is to transform regular sushi into adorable Hello Kitty sushi! Plus, learn how to make pretty pink sushi using a homemade natural dye, then made extra special with a ribbon of edible gingham-patterned paper. [Vegetarian]
Ingredients
Food Items:
- ~1 cup cooked sushi rice (here’s how to prepare sushi rice)
- 2 – 3 sheets nori seaweed
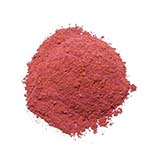
- 1/8 – 1/4 teaspoon beet powder
- 1 slice white cheese (such as provolone, swiss, or white Kraft Singles)
- 1 slice orange cheese (such as cheddar or orange Kraft Singles)
- 1 sheet edible pink gingham paper
- Red food marker
- Edible flowers (optional)
- Your choice of sushi fillings (I used tamagoyaki + bell peppers lightly sauteed in sesame oil)
Recommended Tools:
- Hello Kitty nori punch
- Hello Kitty food cutter set
- Small bow food cutter
- Decorative paper edge scissors – wave design (*sanitized for use with food*)
- Bamboo sushi rolling mat
- Plastic wrap
Instructions
Make the Decorations:
- Using the Hello Kitty nori punch, punch out the full design from a sheet of nori seaweed, reserving the eyes and whiskers (you can discard the nose). Repeat until you have a total of 6 eyes and 18 whiskers – enough to make 3 Hello Kitty faces.
- Using the small oval cutter located on the Hello Kitty food cutter set, cut out 3 ovals from the orange cheese – these will become Hello Kitty’s nose.
- Using the small bow food cutter, cut out 3 bows from the white cheese. Color them red using the edible red food marker, and allow to dry. These will become Hello Kitty’s hair bow.
- Take the edible pink gingham paper and cut it into 3 rectangular strips. Each strip should measure approximately 2 cm high and 15 cm long, although keep in mind the measurements will ultimately depend on the size of your sushi rolls. You can always make the strips shorter if needed, so make them a little longer than you think you’ll need. Next, use the decorative paper edge scissors to cut out a wavy pattern along the top edge of each rectangular strip.
Prepare the Rice:
- Divide your prepared sushi rice into two equal portions.
- Pink Rice: In a small bowl, combine 1/2 – 1 tablespoon of warm water with beet powder and mix until dissolved. Add your homemade dye to one of the rice portions and mix until evenly colored. Feel free to add more beet powder until desired pink color is achieved.
Assembling Sushi:
- Fully wrap your bamboo sushi mat in plastic wrap, then lay it flat so that the slats are horizontal. Take a fresh sheet of nori and carefully rip or cut it in half crosswise. Place one half sheet of nori (shiny side facing DOWN) on top of the sushi mat, and reserve the other nori half for later.
- Add some white rice on top of the nori. Wet your hands with water and gently spread the rice until it evenly covers the entire sheet of nori, adding more as needed to fill in any gaps.
- With wet hands, carefully pick up the nori and flip it over so that the rice side is facing down. Aim to place the nori near the bottom edge of the bamboo mat.
- Place your fillings near the bottom-middle end of the nori, making sure to keep them tight together and horizontally aligned.
- Grab the part of the sushi mat that’s closest to you and begin to roll your sushi away from you, keeping the fillings in place with your fingers. Aim to cover your fillings with the first roll, then continue rolling until there’s no nori left, using the bamboo mat to tighten and shape the roll along the way. TIP: Adding a little bit of water along the vacant edge of nori at the end of your roll will help things stick together better.
- With a sharp, wet knife, cut your sushi roll into 4 pieces. Re-wet the knife in between each cut by wiping it clean on a damp towel. Select the 3 best looking sushi rolls and set aside. The fourth is an extra – consider it a chef’s treat! Or you can make it into a 4th Hello Kitty sushi roll.
- Repeat steps 1 – 6 with the pink rice and the remaining half sheet of nori. You should end up with 4 pretty pink sushi rolls (3 for the bento, 1 for you!).
Hello Kitty Sushi:
- Using tweezers, apply the Hello Kitty nori facial features (eyes + whiskers) to the front of a white sushi roll. Next, place the orange cheese nose in between the two eyes. Finally, place the colored cheese bow near the top right edge of the sushi roll. TIP: Use a bit of honey or mayo to help the cheese pieces stick on better. Repeat this step on the remaining 2 white sushi rolls, until you have 3 Hello Kitty sushi rolls.
Pink Gingham Sushi:
- Take one of the rectangular edible paper strips and carefully wrap it around the middle of a pink sushi roll. You may need to adjust the length of the edible paper, so have a pair of scissors handy.
- Optional: Take one of the edible flowers and carefully insert it into the middle of the edible paper strip. I did this by using a small piece of uncooked spaghetti – just push it into the back of the flower, and you’ll have an edible pushpin!
- Repeat step 1 (and 2, if doing) on the remaining 2 pink sushi rolls.
© Love At First Bento. All images and content on this site are copyright protected. Please do not use any image without my prior permission. If you’d like to share this recipe on your own site, you are required to (1) link back to this post and (2) rewrite any instructions in your own words.


Comments (4)
I love that these are easy to make and SO CUTE!!! Almost too cute to eat. I love all your bento box creations 🙂
Thanks so so much Kelly! 😀 Always appreciate the support <333
dang i’m surprised how well the food cutter works (and how defined those hello kitty carrots are!).
★★★★★
Ikr? Just takes a bit of practice 😉 I find the Hello Kitty carrots come out beautifully if you use lightly boiled carrot slices.