Description
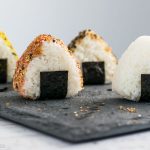
Step-by-step instructions for making classic triangle onigiri (AKA Japanese rice balls) using a rice mold, + an easy and delicious filling of soy sauce & bonito flakes that literally takes 2 seconds to make!
Ingredients
Food Items:
- Japanese short-grain rice, cooked (please make SURE it’s specifically this rice – no other type of rice will work)
- Nori seaweed, cut into 9 cm x 3 cm strips*
- Salt (optional)
Okaka Filling (for one rice ball):
- 1 tablespoon bonito flakes (katsuobushi)
- 1/4 – 1/2 teaspoon soy sauce
Recommended Tools:
- Triangular onigiri mold
- Plastic wrap
Instructions
Okaka:
- In a small bowl, mix together bonito flakes and soy sauce. If necessary, add more soy sauce a drop at a time – be careful, as you don’t want the filling to be runny.
Onigiri:
- KEY INSTRUCTION #1: With a damp paper towel, wipe the entire inside of your onigiri mold until it’s completely damp. Also wet the removable top piece as well, on the side that will push into the rice.
- Optional: Sprinkle the inside of the mold with a tiny pinch of salt. I like to rotate the mold in my hands to help spread the salt more evenly on all sides.
- Using a rice paddle or spoon, fill your mold just below the halfway point with warm rice. KEY INSTRUCTION #2: Make sure you press the rice gently but firmly into all the crevices of the mold.
- With the handle of your rice paddle or spoon, make a small indentation in the center of your rice, just deep enough to hold your filling.
- Spoon your okaka filling into the indent. It’s okay if you pile it up a bit.
- Fill the rest of your mold with rice, until about the 3/4 point – you’ll need some room for the removable top piece to fit on top. Optional: Sprinkle a little salt on top of the newly added rice.
- Take the removable top piece and insert it into the mold. Push with gentle pressure until the top piece is fully inserted into the mold.
- Remove the top piece, and flip the rice mold over, making sure to do this over top of a plate covered in plastic wrap. If your rice mold has little push indents on the bottom, push it gently with your thumb, then gently tap the bottom and sides of the mold until the onigiri slides out.
- Attach your strip of nori onto the onigiri.
- Wrap onigiri in plastic wrap until ready to serve or pack in a bento.
Notes
- *The size of your nori strips will vary depending on the size of your mold, but you can use these measurements as a starting point.
- Here’s the best way to reheat onigiri: cover in a damp paper towel, and microwave for 30 – 40 seconds. They’ll taste just like fresh ones!
- If you’re interested in making spherical onigiri, then I highly recommend this mold – it makes 3 mini balls, and it’s SUPER fun and easy to use!

Share This Bento!
Spread the bento love to your friends & family ~