Description
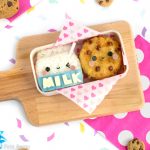
Step-by-step instructions for turning rice and korokke (potato croquette) into an ADORABLE milk & cookies bento box! Plus, easily shape rice into a milk carton shape with a common kitchen item found in every household.
Ingredients
Food Items:
- 1 cooked potato korokke patty (recipe I used can be found here)
- 1/4 – 1/2 cup cooked Japanese short-grain rice
- Nori seaweed
- 1 slice chicken ham or turkey ham
- 1 slice regular pink ham
- White cheese (such as swiss, provolone, or white Kraft Singles)
- 1 – 2 teaspoons Blue Matcha powder
- Tonkatsu sauce (such as Bull Dog brand)
Recommended Tools:
- Small 6×6 cm tupperware container
- Smiley face nori punch
- Cat face nori punch (that comes with this cat onigiri mold kit)
- Small circle food cutter
- Alphabet food cutters (letters M, I, L, and K)
- Winking face nori punch (optional)
- Drinking straw
- Plastic wrap
Instructions
Decorations:
- Place the chicken ham in a glass bowl, and pour enough warm water over top to cover it fully. Add the Blue Matcha powder and mix. Allow the ham to sit in the blue dye for a minimum of 15 minutes – the longer it sits in the dye, the darker blue it will become. Feel free to add more Blue Matcha powder if the color doesn’t seem dark enough.
- Using the smiley face nori punch, punch out the full design from the nori. Reserve the two curved eyes – these will become the tiny mouths for the milk and the cookie.
- Using the cat face nori punch, punch out two sets of eyes from the nori. Make sure you punch these out using the rubber mat the kit comes with.
- Optional: Using the winking face nori punch, punch out the full design from the nori. Reserve the “winking eye” – this will become the milk’s winking eye.
- Using the small circle cutter, cut out 4 circles from the pink ham – these will become the rosy cheeks.
- Using the alphabet cutters, cut out an M, I, L, and K shape from the white cheese.
- Once your chicken ham has turned blue, take it out of the dye and cut it into a rectangular strip with a knife. The length of the strip should be equivalent to the length of the tupperware container you will use to mold your rice, and the height should be tall enough to fit the cheese letters.
- Take the drinking straw and cut off a 3 cm length piece – this will become the milk’s mini straw.
Milk Carton:
- Take your tupperware container and wet it thoroughly with a damp paper towel. Fill the container until full with warm sushi rice, patting down the top with the back of a rice paddle or spoon until it’s flat. Turn container upside down over a sheet of plastic wrap, tapping the bottom and gently shaking until the rice slides out.
- Wrap the rice square fully in plastic wrap. Begin by flattening the square with the palm of your hand – we want a chubby milk carton, after all (because chubby = cute). Smooth out the edges so that they remain straight. Next, take your index finger and press down horizontally across the top edge of the rice square – this will become the milk carton’s flap. Rub your finger back and forth gently across the rice, until desired shape is achieved. To further delineate the flap from the rest of the milk carton, press down with your fingertip into the crease that has now formed to further define it. Lastly, press the top two corners in towards the center using your fingers, gently pushing inwards and rubbing upwards – this step ensures the top edge of the milk carton is slightly shorter in length than the bottom edge, which gives the milk a slightly more 3D effect. <– For a complete visual demo of the rice molding, refer to the video tutorial
- With your rice milk carton lying on a flat surface, apply the strip of blue ham across the very bottom of the milk carton using tweezers or chopsticks. Feel free to coat the back with some mayo or honey to help it stick better.
- Using tweezers, place the cheese letters on top of the blue ham strip so that they spell MILK. Feel free to use some mayo or honey to help them stick better.
- Using tweezers, apply the nori eyes and mouth just above the MILK label. If you have the optional winking nori eye, apply this in place of one eye.
- Using tweezers, apply the rosy ham cheeks, placing them just under the outer edge of each eye. Feel free to use some mayo or honey to help them stick better.
- Take a chopstick and make a small indent near the top right corner of the milk carton (not the flap portion). Stick the 3 cm straw into the indent, pushing it in lightly until secure.
Chocolate Chip Cookie:
- With the korokke patty lying on a flat surface, apply the nori eyes and mouth using tweezers. Feel free to use some mayo or honey to help them stick better.
- Using tweezers, apply the rosy ham cheeks, placing them just under the outer edge of each eye. Feel free to use some mayo or honey to help them stick better.
- Using a small squeeze bottle, the back end of a chopstick, or a spoon, apply small circles of tonkatsu sauce randomly on top of the korokke patty to form the “chocolate chips”.
Notes
- To make the cookie food pick, you will need aburaage, nori, and peas. Cut the aburaage into small circles using a circle cutter (I only made 2), then carefully skewer them onto your pick, inserting peas in between. Punch out tiny faces and “chocolate chip” circles from the nori (I recommend this punch for the face and this punch for the circles), then apply them to the aburaage circles with tweezers. If you’d like for one cookie to have a “bite” taken out of it, take your circle cutter and use it to cut off a little piece from one side.

Share This Bento!
Spread the bento love to your friends & family ~