Description
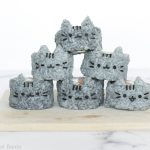
Pusheen Sushi – AKA “Susheen” – transforms everyone’s favorite cat into adorable sushi form! Made with 100% natural ingredients, these sushi rolls can easily be filled with whatever fillings your heart desires, and are guaranteed to be a big hit with Pusheen fans of all ages! Step-by-step instructions + photos makes this a sushi recipe ANYONE can master.
Ingredients
Food Items:
- ~2 & 1/4 cups cooked sushi rice (here’s how to prepare sushi rice)
- 2 – 3 sheets nori seaweed
- 1/16 – 1/8 teaspoon charcoal powder
- Your choice of fillings (I used cucumber, smoked salmon, & cream cheese)
Recommended Tools:
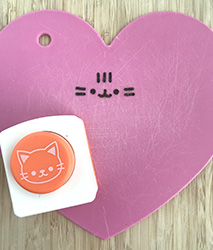
- Cat face nori punch
- Bamboo sushi rolling mat
- Scissors
- Plastic wrap
Instructions
Prepare the Nori:
- Take the sheets of nori seaweed and, using clean scissors, cut them so they measure approximately 18 cm x 10 cm. Reserve the scrap pieces of nori for the next step.
- Using the cat face nori punch, punch out the full design from the scrap pieces of nori seaweed (or you can use a new sheet of nori), reserving the eyes, whiskers, and nose/mouth pieces. Repeat until you have a total of 12 eyes, 42 whiskers, and 6 nose/mouths (this will give you enough facial features to create 6 Pusheen sushi rolls).
- Optional: Take one of the nori nose/mouth pieces, and, with scissors, carefully cut off both sides of the nose, until you are left with only a straight line sticking up from the mouth. Repeat with remaining nose/mouth pieces.
Dying the Rice:
- Divide the cooked sushi rice into 2 portions: one portion will contain 1 cup of rice, and the second portion will contain 1 & 1/4 cups of rice.
- Grey Rice: In a small bowl, combine 1/2 – 1 tablespoon of warm water with charcoal powder and mix until dissolved. Add your homemade dye to the 1 & 1/4 cup rice portion and mix until evenly colored. Feel free to add more charcoal powder until desired grey color is achieved.
Assembling Sushi:
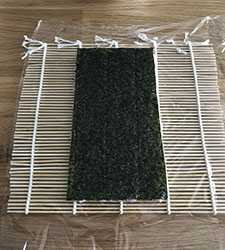
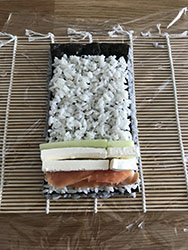
- Fully wrap your bamboo sushi mat in plastic wrap, then lay it flat so that the slats are horizontal. Place one of the 18 x 10 cm sheets of nori on top of the sushi mat, with the shorter edge closest to you (see Image in Step 2 below).
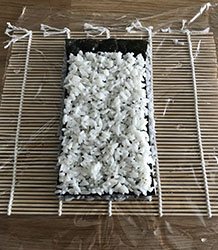
- Add some grey rice on top of the nori. Wet your hands with water and gently spread the rice until it evenly covers the entire sheet of nori, adding more as needed to fill in any gaps.

- With wet hands, carefully pick up the nori and flip it over so that the rice side is facing down.
- Add some white rice on top of the nori. Wet your hands with water and gently spread the rice until it evenly covers the entire sheet of nori, leaving a 1-inch space of uncovered nori at the end furthest from you.
- Place your fillings near the bottom end of the nori, making sure to keep them tight together and horizontally aligned.
- Grab the part of the sushi mat that’s closest to you and begin to roll your sushi away from you, keeping the fillings in place with your fingers. Aim to cover your fillings with the first roll, then continue rolling until there’s no nori left, using the bamboo mat to tighten and shape the roll along the way. Adding a little bit of water along the vacant edge of nori at the end of your roll will help things stick together better.
- With a sharp, wet knife, cut your sushi roll into 3 pieces. Re-wet the knife in between each cut by wiping it clean on a damp towel.
- Repeat steps 1 – 7 with remaining rice and fillings to create 3 more sushi rolls. IMPORTANT: Be sure to reserve about 3 tablespoons of grey rice, so that you can make Pusheen’s ears.
Decorating:
- To make the ears: Add a tiny amount of grey rice (about 1/4 teaspoon’s worth) to a small square of plastic wrap, and wrap completely. Press the rice together to form a tiny compressed ball. Taking your thumb and index finger, pinch & pull at one end of the rice ball until a point is formed. Press the opposite end into the palm of your hand to create a flattened bottom. Flatten the sides by rubbing them against your palm, and/or pressing them against a flat surface (like a tabletop). Continue shaping and smoothing with your fingers and palms until a small triangle has formed. Repeat this whole process to make the second ear.
- Carefully place the two ears on top of a sushi roll, leaving enough space in between for Pusheen’s 3 forehead stripes. Press the ears down into the sushi roll gently to help them stick and adhere. If the rice is sticky enough, the ears should naturally stick to the sushi roll without falling off, but feel free to use an uncooked piece of pasta for even greater security (instructions + video for securing rice with pasta can be found here).
- Repeat steps 1 – 2 until all Pusheen sushi rolls have ears attached.
- Using tweezers, apply the nori facial features (eyes, nose/mouth, 4 whiskers, and 3 forehead stripes) to the front of the sushi roll. Feel free to use some mayo or honey to help them stick better. Use a picture of Pusheen as a guide for more exact facial feature placement. Repeat with remaining sushi rolls.
Notes
- To make the smiling, open-mouthed Pusheen face, I used the semicircle eye pieces made from this nori punch. Simply place this additional piece onto the bottom of the nori nose/mouth using tweezers. It should look like one complete mouth once attached.
- For a visual demonstration of how to make sushi from start to finish, please refer to my Candy Cane Sushi video tutorial.
- Remember: always keep a small bowl of water handy at your sushi making station, and use it to wet your hands before touching/spreading the rice. Trust me – the rice WILL stick to your hands if they’re not wet!

Share This Bento!
Spread the bento love to your friends & family ~