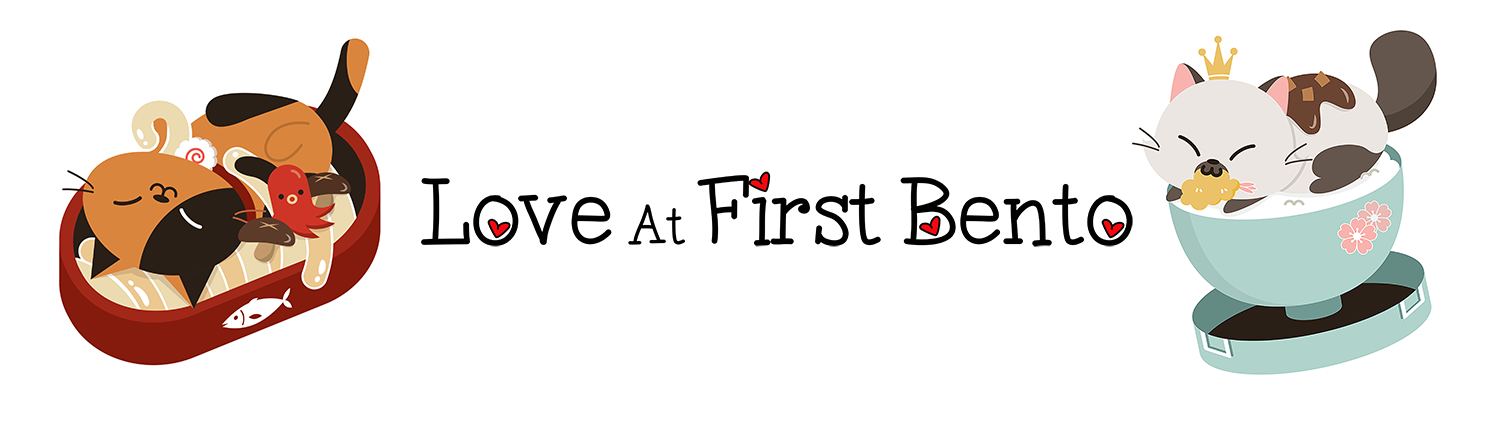
Pusheenosaurus is here to make your bento box prehistorically adorable!

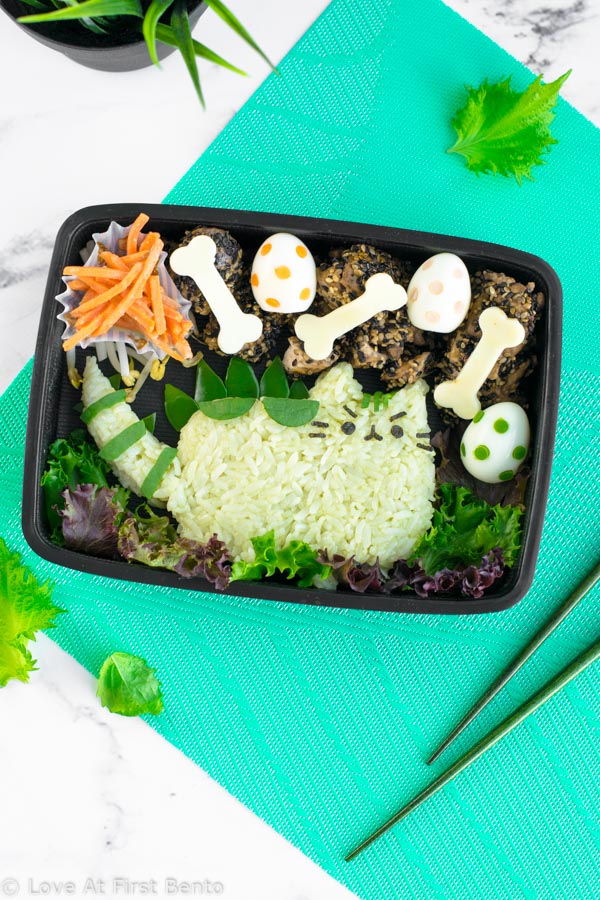
Fun fact: little grade 2 me wanted to be a paleontologist when she grew up. Needless to say, that goal didn’t exactly pan out – Jurassic Park kind of scared me away from the profession. However, I think I just may have taken a step closer to my grade 2 occupational dreams with this bento box, which combines my dormant love of dinosaurs with my present day love for Pusheen the Cat. Say hello to the friendly feline herbivore “Pusheenosaurus” (AKA Dinosaur Pusheen), a rare species of dinosaur who’s ready to fill your next bento box with ridiculous, lethal levels of cuteness.
Now, I’m not gonna sugarcoat things: this bento does require you to get a little bit hands-on with the rice. I know, you’re probably having horrifying flashbacks of failed attempts at making clay sculptures in middle school art class right about now (it’s okay, I am too), but hear me out: there’s one sneaky way of making this rice molding just a little bit easier.
The trick is to use a rice mold to shape Pusheen’s body, which is literally 85% of the work right there. I used a nigiri sushi mold for this, which is technically meant for forming 3 individual cylinders of rice, but we’re just gonna go ahead and bend the rules. (#rebel) Think about it this way: Pusheen’s cute chubby body, is, essentially, a rounded rectangle. By purposely overfilling our mold so that all of the cylinders become one, we end up with *drum roll please* a rounded rectangle. I’m telling you, it works perfectly, and has become my new go-to method for creating Pusheen-shaped rice. You can see exactly how this is done in the Pusheenosaurus video tutorial (along with how I shaped the other 15% of Pusheenosaurus) ← highly recommended.
Watch how to make Pusheenosaurus bento (70 sec):
And to make the rice that Jurassic-tastic green color, I used matcha green tea powder, which, as an added bonus, smells amazing when mixed with warm rice. It’ll help put you into a zen state before tackling that rice molding. 😉
I packed this Pusheenosaurus bento box with balsamic sesame chicken, a miso carrot salad, and some fresh bean sprouts and leafy greens. To make it extra prehistoric, I added white cheese “bones” atop the chicken – I figured it looked like a rocky fossil bed that way – and some “dinosaur” quail eggs. You can learn how to make these ultra cute dinosaur eggs in my easy egg decorating tutorial – they make for a great way to decorate any bento box!
So the next time you’re in the mood for a little prehistoric cuteness, try adding Pusheenosaurus to your bento box – she’ll be sure to please herbivores and carnivores alike. 😉
Pusheenosaurus Bento Box

 Yield: 1 Pusheenosaurus
 Category: Character Bento
Description
Make your very own Pusheenosaurus (dinosaur Pusheen) bento box with these step-by-step instructions.
Ingredients
Food Items:
- ~ 1 cup Japanese short-grain rice, cooked
- 1/4 teaspoon matcha powder
- Nori seaweed
- Green pepper
- Spinach leaves
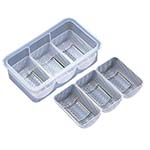
Recommended Tools:
- Nigiri sushi mold
- Cat nori punch
- Rain drop cutter (~ 1.5 cm)
- Circle cutter (~ 2 cm)
- Plastic wrap
Instructions
Decorations:
- Using the rain drop cutter, make 5 rain drop cutouts from the green pepper – these will become the spikes along Pusheenosaurus’ back.
- Using the pointy tip of the rain drop cutter, cut out 4 small triangles from the remaining green pepper (right along the edges) – these will become the tail spikes.
- Using the circle cutter, make a circle cutout from the spinach. Cut this in half with a knife. These will become the spots along Pusheenosaurus’ back.
- Using the circle cutter, make 2 more circle cutouts from the spinach. Take one circle, and cut out 3 thin strips with a knife – these will become the forehead stripes. Take the second circle, and cut it into 3 thick strips with a knife – these will become the tail stripes.
- Using the cat nori punch, punch out a cat face from the nori. Reserve the eyes, nose/mouth, and whisker pieces, and discard the rest. Take the nose/mouth piece, and, with scissors, carefully cut off both sides of the nose, until you are left with only a straight line sticking up from the mouth.
- Using the cat nori punch, punch out a second cat face from nori. This time, you will only be needing the whiskers, as they will become Pusheenosaurus’ angry eyebrows.
Assembling:
- In a small bowl, mix together matcha powder with about 3 – 4 tablespoons of warm water until fully dissolved. Add matcha mixture to warm sushi rice, and mix until evenly incorporated.
- Add the green rice to the nigiri sushi mold, keeping the mold inside the rectangular holder it comes in. You’ll want to fill the rectangle about halfway full, and ensure none of the cylinder edges are visible. With the back of a rice paddle or spoon, gently press down the rice until it has filled all of the crevices and is relatively flat on top.
- Carefully remove the mold from the rectangular holder, flip over, and gently push against the push indentations on the bottom of the mold until the rice slides out. Do this over top a plate lined with plastic wrap. It’s okay if your rice rectangle has indents from the mold, and/or if it breaks apart slightly into cylinders.
- Wrap the rice in the plastic wrap, and, using your hands, press the rice into a compact rectangle, re-shaping as necessary. Round the corners out by pressing them into the crook between your thumb and index finger. It’s okay if only one side of the rice is smooth (the other side may have indents from the mold) – we only need one smooth side for decorating!
- To make the ears: Place the rectangle rice body down on a flat surface, and add about 2 tablespoons of green rice (1 tbsp for each ear) to the top right end of the rectangle. Using the plastic wrap the rectangle body was wrapped in, gently press and smooth out the newly added rice so that it adheres to the body. Taking your thumb and index finger, pinch & pull at the rice until a point is formed, and then repeat to form the other ear. Once finished, wrap up the entire body and set aside until needed.
- To make the tail: Scoop about 2 spoonfuls of green rice onto a new sheet of plastic wrap (place the spoonfuls side-by-side, as if in a straight line) and wrap up completely. Using your hands, spread out the rice so it becomes a long yet compact “stick”, then begin molding it into the shape of a tail. To form the base of the tail, press one end of the rice stick into the crook between your thumb and index finger, pressing and rocking back and forth. To help form the point of the tail, pinch & pull at the other end of the rice stick with your thumb and index finger, until a point begins to form. Lightly press the whole tail into a gentle curve, using a cupped hand as a guide. Set tail aside until needed.
- To make the legs: Scoop about 1/2 teaspoon of green rice onto a small square of fresh plastic wrap and wrap up completely. With your hands, squish the rice into a small ball, then flatten the sides out slightly so that it resembles a small peg. I find it best to do this by continuously pressing the ball in between your thumb and index finger. Set aside, and repeat 3 more times.
- To put it all together, place the rice body inside the bento box it’ll be served in. With tweezers or chopsticks, add the tail and legs to the body, applying gentle pressure until they stick.
- Using tweezers, add the 5 green pepper spikes along the top edge of the body; they should start right beside the left ear, and end near the top left corner, with no spaces in between.
- Using tweezers, add the 4 green pepper triangles to the tail; 2 will go near the base of the tail, and two will go near the point. They should be sitting opposite each other.
- Using tweezers, place the spinach half circles onto the top of the rice body, right beneath the spikes. The flat ends should line up with the edge of the rice body.
- Using tweezers, place the 3 thick spinach strips along the tail, pressing the ends gently to the rice to adhere.
- Using tweezers, apply the nori facial features. I recommend using a picture of Pusheen as a guide.
- Using tweezers, apply the 3 thin spinach strips in between the ears, pressing the ends gently to the rice to adhere.
Notes
- In order to get a better idea of how to shape each individual rice component, I really recommend watching the video tutorial . Explaining how to shape the rice in words can be difficult and confusing – a visual demonstration is much more helpful, in my opinion. Be sure to give it a watch!
© Love At First Bento. All images and content on this site are copyright protected. Please do not use any image without my prior permission. If you’d like to share this recipe on your own site, you are required to (1) link back to this post and (2) rewrite any instructions in your own words.
Tools used to make this bento:

![Vulpix Pikachu Bento Box - Pokemon fans will FLIP over this insanely adorable Pokemon bento, which features Pikachu dressed up as a Vulpix! 100% edible & perfect for decorating rice, this bento can easily be created by anyone thanks to my 'secret hack' for easily & accurately creating images out of food. Get the recipe at: loveatfirstbento.com [character bento, kyaraben, lunch]](https://loveatfirstbento.com/wp-content/uploads/2018/12/Vulpix-Pikachu-Bento-2-370x240.jpg?x21322)

Comments (2)
Wow!! so cute, I love your video on how to make. Keep up the good work!
★★★★★
Thanks so much, I definitely will! Always happy to know the videos are helpful 🙂