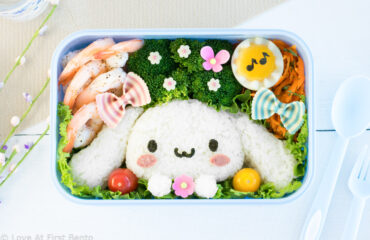
Rilakkuma Rice Balls – a must-have addition to any Rilakkuma fan’s bento box. Super easy to make, and almost too cute to eat!
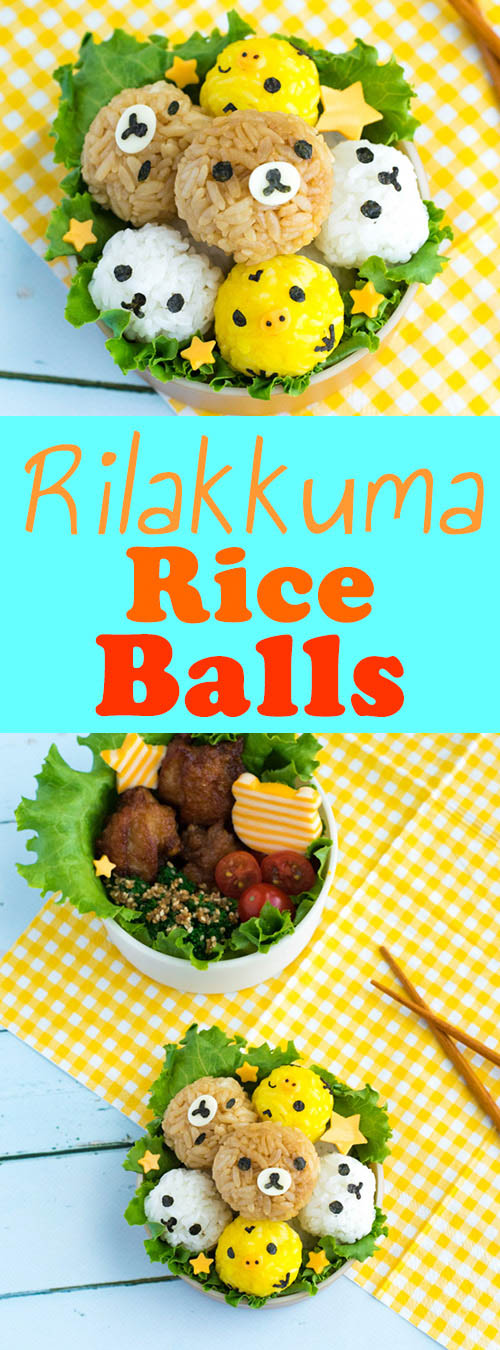

Let’s talk rice balls. Like, literally, rice shaped into cute little teensy balls that you can just pop into your mouth and eat in one bite. We’re going to step up our rice ball game today and multiply their cuteness times 1 million. Behold: Rilakkuma rice balls, featuring Rilakkuma, Korilakkuma, and Kiiroitori. They’re deliciously adorable, easy to eat, and a fun upgrade from a boring old white rice bento.
Okay, I know what you’re thinking: why would I want to slave away making nori-faced rice balls when I could be out enjoying the last few days of summer? Well, friends, I am here to prove to you just how incredibly easy it is to make these Rilakkuma rice balls. And I promise you, no matter who opens up their bento box and sees these adorable little faces beaming up at them, they WILL become transfixed by their cuteness. Guaranteed. My evidence comes from my boyfriend, who immediately responded with “Aww, they’re so cute!” as I plonked them down before him. Guys – he doesn’t readily admit to things being cute. I have a whole army of the world’s most adorable stuffed animals overtaking my bedroom, and he won’t admit that even one is cute. But these? These did the trick. All effort = so worth it.
Allow me to explain both the super easy way to complete this recipe, and then the unnecessarily hard way (just in case you feel like being overly ambitious). Hint: it all has to do with having the right supplies.
Shaping the rice balls
- Hard, completely no fun way: Shape them by hand.
- Easy, super fun way: Using a rice mold that you get to shake like a maraca.
No, I’m not kidding. This super epic rice mold does all of the work for you, and all you have to do in exchange is shake it for a good 30 seconds. I mean, guys – you can literally dance around the kitchen and make lunch AT THE SAME TIME. I promise you, you will feel like an unstoppable rice ball god once you get your hands on this thing. And it even makes 3 at once, meaning you finish your rice ball-making task faster than ever. Seriously, this thing has magical powers.
And before you even mention the word “cleaning”, let me tell you this: 100% dishwasher safe. I’m telling you, life couldn’t get any easier if it tried.
Of course, if you prefer, you can also shape the rice by hand – just wrap a spoonful of warm rice in plastic wrap and roll it around in your palms. But just do yourself the favor, and invest in the maraca rice ball mold (yes I just made that name up).
Watch how to make Rilakkuma Rice Balls (50 sec):
Making the nori facial features
- Hard, tedious way: Cut out the nori shapes by hand, with scissors.
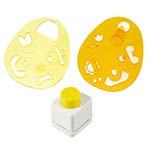
- Easy-Breezy way: Cut out the shapes with a nori punch.
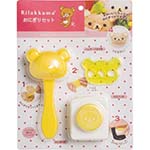
I actually have a specialized Rilakkuma nori punch – purchasing one was a necessity for me, since my sister is a HUGE Rilakkuma fan. However, any punch that produces circles and/or straight lines will work just as well (for instance, you can make Rilakkuma’s mouth out of a circle and two short straight lines).
So, while you can do this without nori punches, the whole process is definitely a lot easier when you have a variety of nori punches to choose from. I actually used a few different ones for this project, to ensure every facial detail was as precise as possible; if you’re interested in knowing exactly which punches I used, check out the Tools used in this bento section down below.
Making the cheese facial features
- Hard, super annoying way: Cut shapes by hand with a knife or toothpick.
- Easy as pie way: Cut out the shapes with a food cutter or drinking straw.
My Rilakkuma nori punch came in a pack that included a specialized Rilakkuma food cutter, so that’s what I used to make the white part of Rilakkuma’s face. I decided to use a different, slightly smaller one to make Kiiroitori’s orange beak, but this really isn’t necessary – feel free to use the Rilakkuma cutter for both, or any small oval or circle cutter you have on hand.
If you don’t have any of these things, then a quick and easy solution is to use a drinking straw; I’d recommend using one of the bigger bubble tea straws for Rilakkuma, and a normal sized one for Kiiroitori. Just cut the straw to about a 1-inch length, pinch the center until an oval shape is formed (or, if you’re lazy, just keep it as a circle and skip this step), and cut out your oval – voila!
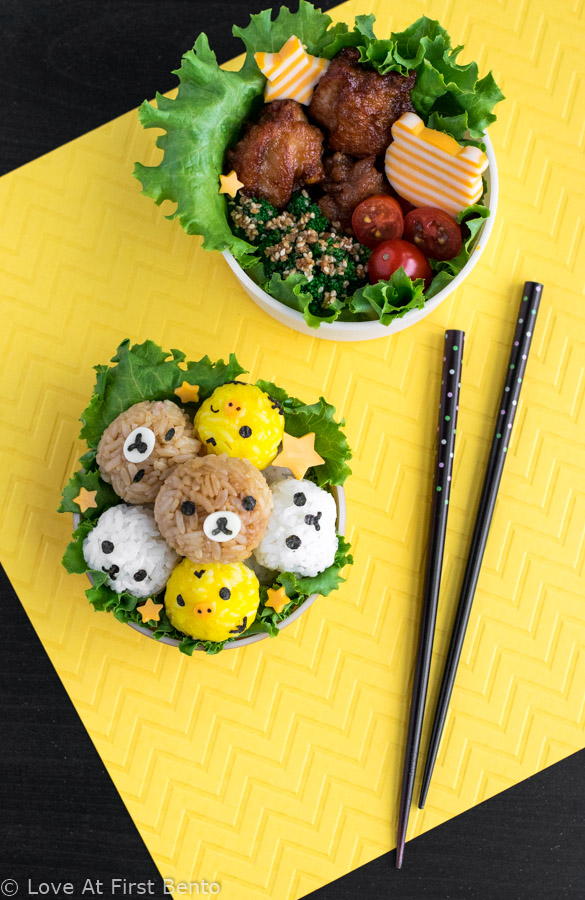
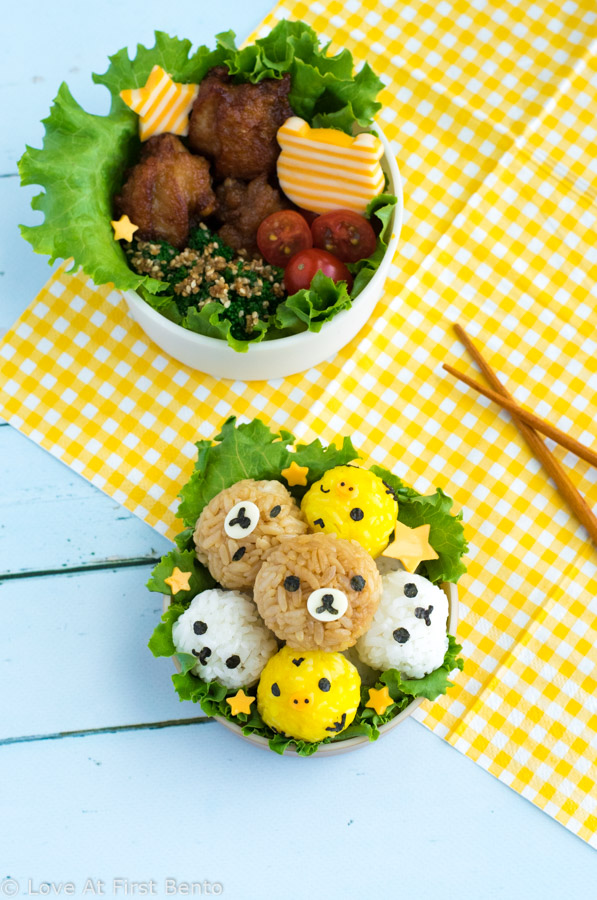
Once these Rilakkuma rice balls were complete, I packed them into a circular bento box, as I thought the Rilakkuma faces looked cutest when all stacked up in a circular pattern. I filled the bottom bento container with leftover chicken karaage, sesame broccoli, striped cheese bear & star cutouts, and cherry tomatoes.
So, make someone’s day a little brighter by making them these adorable Rilakkuma rice balls. They’re delicious, easy to make, and guaranteed to make your loved one smile when they open up their bento box (which, in my opinion, makes everything worth it)!
Print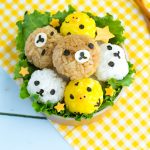
Rilakkuma Rice Balls

 Yield: ~9 rice balls
 Category: Character Bento
Description
Step-by-step instructions for making Rilakkuma, Korilakkuma, & Kiiroitori rice balls. Perfect for a Rilakkuma themed bento box!
Ingredients
Food Items:
- 1.5 cups cooked Japanese short-grain rice, divided into 1/2 cup portions
- 1/2 tablespoon soy sauce
- 2 hard-boiled egg yolks
- 1/2 tablespoon mayonnaise
- 1/8 teaspoon turmeric
- Nori seaweed
- Orange cheese (such as cheddar or Kraft Singles)
- White cheese (such as provolone, swiss, or white Kraft Singles)
- Honey or mayonnaise
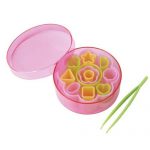
Recommended Tools:
- Mini rice ball mold
- Rilakkuma nori punch
- Multi-purpose nori punch
- Small smiley face nori punch (See Notes for alternative option)
- Rilakkuma facial feature cutter
Optional Tools (these will give you a more precise design):
- Small oval or circle cutter
- Winking face nori punch
- Small circle nori punch
Instructions
Facial Features:
- Using the Rilakkuma food cutter, cut out 3 ovals from white cheese, and 3 ovals from the orange cheese.
- Using the Rilakkuma nori punch, punch out 6 sets of Rilakkuma faces from nori (3 for Rilakkuma, and 3 for Korilakkuma).
- Using the multi-purpose nori punch, punch the full design out 3 times from nori. You will be needing a total of 6 circles, and 3 carets (^) – these will become Kiiroitori’s eyes and hair tufts, respectively.
- Using the small smiley face nori punch, punch out 3 pairs of eyes from nori – these will become Kiiroitori’s nostrils.
- Optional: Using the winking face nori punch, punch out 6 “winks” (the eye that’s winking) from nori – these will become Kiiroitori’s feet.
Rilakkuma Rice Balls:
- Add soy sauce to 1/2 cup of warm sushi rice, and mix until rice is evenly brown in color. Feel free to add a little more soy sauce if needed.
- Fill rice mold with soy sauce rice, shake for 30 seconds, and carefully remove rice balls from mold. Wrap each rice ball in plastic wrap until ready to decorate.
- Using tweezers, dip one side of the white cheese oval in honey or mayo. Place in the middle of a brown rice ball, sticky-side down.
- Using tweezers, place the nori Rilakkuma mouth directly on top of the white cheese oval.
- Using tweezers, place the nori Rilakkuma eyes just slightly above the mouth.
- Repeat this decorating process on the other 2 brown rice balls.
Korilakkuma Rice Balls:
- Fill rice mold with plain white rice, shake for 30 seconds, and carefully remove rice balls from mold. Wrap each rice ball in plastic wrap until ready to decorate.
- Using tweezers, place the nori Rilakkuma mouth in the middle of the rice ball.
- Using tweezers, place the nori Rilakkuma eyes just slightly above the mouth.
- Repeat this decorating process on the other 2 white rice balls.
Kiiroitori Rice Balls:
- In a small bowl, mix together mayonnaise and turmeric until it becomes an even yellow color. Add more turmeric if necessary.
- Add your hard-boiled egg yolks to the mayo-turmeric mixture, and mash and mix with a fork until you end up with a relatively smooth, evenly colored yellow paste.
- Add the yellow egg mix to 1/2 cup of warm sushi rice, and mix until rice is evenly yellow in color.
- Fill rice mold with yellow rice, shake for 30 seconds, and carefully remove rice balls from mold. Wrap each rice ball in plastic wrap until ready to decorate.
- Using tweezers, dip one side of the orange cheese oval in honey or mayo. Place in the middle of a yellow rice ball, sticky-side down.
- Using tweezers, place 2 nori nostrils directly on top of the orange cheese oval.
- Using tweezers, place the nori Kiiroitori eyes just slightly above his beak.
- Using tweezers, place the nori caret (^) near the top of the rice ball, pointy side facing down towards the face.
- Optional: If you have nori Kiiroitori feet cutouts, then place these near the bottom of the rice ball, with the claws facing slightly inward towards the middle.
- Repeat this decorating process on the other 2 yellow rice balls.
Notes
- Here’s how I used the optional tools in this recipe: small circle nori punch = Kiiroitori’s eyes; winking face nori punch = Kiiroitori’s feet; small oval cutter = Kiiroitori’s beak (cut from orange cheese).
- Another way to make Kiiroitori’s nostrils: take a square or rectangular piece of nori, and cut off the very tips of each corner, so that you’re left with tiny black “dots”.
- You can also use the multi-purpose nori punch to make Kiiroitori’s feet. Just take the straight line cutout, cut it in half, and repeat this until you have 9 short straight lines. Then, you can add his feet to the rice ball “claw by claw”.
© Love At First Bento. All images and content on this site are copyright protected. Please do not use any image without my prior permission. If you’d like to share this recipe on your own site, you are required to (1) link back to this post and (2) rewrite any instructions in your own words.


![Vulpix Pikachu Bento Box - Pokemon fans will FLIP over this insanely adorable Pokemon bento, which features Pikachu dressed up as a Vulpix! 100% edible & perfect for decorating rice, this bento can easily be created by anyone thanks to my 'secret hack' for easily & accurately creating images out of food. Get the recipe at: loveatfirstbento.com [character bento, kyaraben, lunch]](https://loveatfirstbento.com/wp-content/uploads/2018/12/Vulpix-Pikachu-Bento-2-370x240.jpg?x21322)

Comments (6)
love this!
★★★★★
So glad you like it! 🙂
so cute! AND i have both the rilakkuma set and the rice shaker heehee
Nice!! I absolutely love that rice ball shaker, it’s seriously the best invention.
Glad you like these cute little guys 😉
Have you tried using jasmine rice? Wondering if it would work as well as Japanese short grain rice. Thank you 🙂
★★★★★
Hi Steven! Unfortunately jasmine rice wouldn’t work in this recipe – it won’t be sticky enough to form the ball shapes. Check out my How to Make Onigiri (Japanese Rice Balls) for more info on why it’s best to specifically use sushi rice 🙂