Description
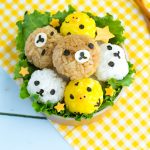
Step-by-step instructions for making Rilakkuma, Korilakkuma, & Kiiroitori rice balls. Perfect for a Rilakkuma themed bento box!
Ingredients
Food Items:
- 1.5 cups cooked Japanese short-grain rice, divided into 1/2 cup portions
- 1/2 tablespoon soy sauce
- 2 hard-boiled egg yolks
- 1/2 tablespoon mayonnaise
- 1/8 teaspoon turmeric
- Nori seaweed
- Orange cheese (such as cheddar or Kraft Singles)
- White cheese (such as provolone, swiss, or white Kraft Singles)
- Honey or mayonnaise
Recommended Tools:
- Mini rice ball mold
- Rilakkuma nori punch
- Multi-purpose nori punch
- Small smiley face nori punch (See Notes for alternative option)
- Rilakkuma facial feature cutter
Optional Tools (these will give you a more precise design):
- Small oval or circle cutter
- Winking face nori punch
- Small circle nori punch
Instructions
Facial Features:
- Using the Rilakkuma food cutter, cut out 3 ovals from white cheese, and 3 ovals from the orange cheese.
- Using the Rilakkuma nori punch, punch out 6 sets of Rilakkuma faces from nori (3 for Rilakkuma, and 3 for Korilakkuma).
- Using the multi-purpose nori punch, punch the full design out 3 times from nori. You will be needing a total of 6 circles, and 3 carets (^) – these will become Kiiroitori’s eyes and hair tufts, respectively.
- Using the small smiley face nori punch, punch out 3 pairs of eyes from nori – these will become Kiiroitori’s nostrils.
- Optional: Using the winking face nori punch, punch out 6 “winks” (the eye that’s winking) from nori – these will become Kiiroitori’s feet.
Rilakkuma Rice Balls:
- Add soy sauce to 1/2 cup of warm sushi rice, and mix until rice is evenly brown in color. Feel free to add a little more soy sauce if needed.
- Fill rice mold with soy sauce rice, shake for 30 seconds, and carefully remove rice balls from mold. Wrap each rice ball in plastic wrap until ready to decorate.
- Using tweezers, dip one side of the white cheese oval in honey or mayo. Place in the middle of a brown rice ball, sticky-side down.
- Using tweezers, place the nori Rilakkuma mouth directly on top of the white cheese oval.
- Using tweezers, place the nori Rilakkuma eyes just slightly above the mouth.
- Repeat this decorating process on the other 2 brown rice balls.
Korilakkuma Rice Balls:
- Fill rice mold with plain white rice, shake for 30 seconds, and carefully remove rice balls from mold. Wrap each rice ball in plastic wrap until ready to decorate.
- Using tweezers, place the nori Rilakkuma mouth in the middle of the rice ball.
- Using tweezers, place the nori Rilakkuma eyes just slightly above the mouth.
- Repeat this decorating process on the other 2 white rice balls.
Kiiroitori Rice Balls:
- In a small bowl, mix together mayonnaise and turmeric until it becomes an even yellow color. Add more turmeric if necessary.
- Add your hard-boiled egg yolks to the mayo-turmeric mixture, and mash and mix with a fork until you end up with a relatively smooth, evenly colored yellow paste.
- Add the yellow egg mix to 1/2 cup of warm sushi rice, and mix until rice is evenly yellow in color.
- Fill rice mold with yellow rice, shake for 30 seconds, and carefully remove rice balls from mold. Wrap each rice ball in plastic wrap until ready to decorate.
- Using tweezers, dip one side of the orange cheese oval in honey or mayo. Place in the middle of a yellow rice ball, sticky-side down.
- Using tweezers, place 2 nori nostrils directly on top of the orange cheese oval.
- Using tweezers, place the nori Kiiroitori eyes just slightly above his beak.
- Using tweezers, place the nori caret (^) near the top of the rice ball, pointy side facing down towards the face.
- Optional: If you have nori Kiiroitori feet cutouts, then place these near the bottom of the rice ball, with the claws facing slightly inward towards the middle.
- Repeat this decorating process on the other 2 yellow rice balls.
Notes
- Here’s how I used the optional tools in this recipe: small circle nori punch = Kiiroitori’s eyes; winking face nori punch = Kiiroitori’s feet; small oval cutter = Kiiroitori’s beak (cut from orange cheese).
- Another way to make Kiiroitori’s nostrils: take a square or rectangular piece of nori, and cut off the very tips of each corner, so that you’re left with tiny black “dots”.
- You can also use the multi-purpose nori punch to make Kiiroitori’s feet. Just take the straight line cutout, cut it in half, and repeat this until you have 9 short straight lines. Then, you can add his feet to the rice ball “claw by claw”.

Share This Bento!
Spread the bento love to your friends & family ~