Description
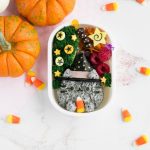
Step-by-step instructions for creating an adorable Witch Pusheen Bento Box. Made from naturally dyed rice + nori, this character bento box is the perfect lunch idea for any Pusheen or Halloween fan. It’s so cute, it’s scary!
Ingredients
Food Items:
- ~ 1 cup cooked Japanese short-grain rice
- 1 – 2 tablespoons ground black sesame seeds
- Nori seaweed
- 1/2 slice ham or salami
- 1 slice white cheese (such as provolone, swiss, or white Kraft Singles)
- 1 black food marker
- 1 uncooked spaghetti noodle
- 1 candy corn (optional)
- Edible gold star sprinkles (optional)
Recommended Tools:
- Cat face nori punch (that comes with this cat onigiri mold kit)
- Scissors
- Plastic wrap
Instructions
Facial Features & Details:
- Using the cat face nori punch, punch out one pair of eyes, 4 whiskers, and 1 mouth. Make sure you punch these out using the rubber mat the kit comes with.
- With a knife, cut out a thin rectangular strip of ham – this will become the decorative wrap portion of the witch hat. Aim for having it be around 5 cm in length (but this will ultimately depend on how big you make your Pusheen head).
- Using a craft knife, paring knife, or toothpick, cut out a semicircle from the white cheese that matches the shape of the diagram pictured below – this will become the rim of the witch hat. Use a drinking cup as a trace to help guide your knife.

- Take a sheet of nori and cut it into 2 squares that are roughly the same size. Stack both squares on top of each other, then place the white cheese semicircle (from Step 3) on top of the nori stack. Holding both stacks of nori together, carefully cut around the cheese semicircle with scissors, until you end up with two nori semicircles. (One nori semicircle will probably be stuck to the cheese – if so, leave it like that.) Cover both sides of the cheese with the nori semicircles (they should stick with a bit of rubbing).
- Carefully take the nori/cheese hat rim and, using the black food marker, completely color in the exposed convex edge until there’s no visible white left.
- Using scissors, cut out a trapezoid shape from the nori (you can use any scrap pieces you may have leftover). This will become the pointy part of the witch hat.
Molding the Rice:
- Add ground black sesame seeds to warm rice and mix until evenly colored. Feel free to add more ground black sesame if you’d like a darker grey color.
- To make the head: Add two scoops of grey rice atop a clean sheet of plastic wrap, and wrap completely. Using your hands, mold the rice into an ice cream cone shape (one pointy end, and one rounded end). To shape the round end, place the rice in a cupped hand and gently round out the edges with your fingers and palms. To shape the pointy end, pinch and pull at the rice with your fingers and thumb until a point begins to form. Smooth out all edges as necessary by rubbing with your fingers and against your palms.
- Take your nori trapezoid, and wrap it around the pointy portion of your rice “head” (the shorter trapezoid end should be at the top) – you should now have the beginning’s of a witch hat, and a circular grey face right underneath. Completely wrap the rice head in a clean sheet of plastic wrap, smoothing down the nori as necessary to ensure it’s fully adhered to the rice. Allow to rest for at least 10 minutes.
- To make the ears: Add a tiny spoonful of grey rice to a small square of plastic wrap, and wrap completely. Taking your thumb and index finger, pinch & pull at one end of the rice until a point is formed. Press the opposite end into the palm of your hand to create a flattened bottom. Continue shaping and smoothing with your fingers and palms until a small triangle has formed. Repeat this whole process to make the second ear. Keep both ears wrapped in plastic wrap once finished.
- To make the paws: Add a tiny spoonful of grey rice to a small square of plastic wrap, and wrap completely. Begin forming a tiny ball by squishing the rice together and then rolling it around in the palm of your hand or between your fingers. Once smooth, wrap in plastic wrap and repeat to create a second paw.
Assembly:
- Place the rice head portion into the bento box you will be using. Using tweezers, place the strip of ham right across the bottom length of the “witch hat”. You may need to cut off the ends of the ham if the strip is too long. To help the ham adhere better, feel free to cover the back with some mayo or honey; another option would be to secure it in place using small pieces of uncooked spaghetti (think of them as “pins”), which will soften from the moisture of the rice by lunchtime.
- Break off two 1/2 cm pieces of uncooked spaghetti, and stick these carefully into the concave side of your cheese/nori hat rim, making sure to leave a bit of the spaghetti sticking out. Gently insert the hat rim into the rice head, right beneath the ham strip, pushing gently until the spaghetti pieces are fully inserted.
- Carefully place the rice ears atop the hat rim, near the outside edges. To help them adhere better, insert a small piece of uncooked spaghetti into the back of each ear, and gently push them into the hat portion of the head like you would a pushpin.
- Using tweezers, apply the nori facial features (eyes, mouth, & whiskers) to Pusheen’s face. Feel free to use some mayo or honey to help them stick better. Use a picture of Pusheen as a guide for more exact facial feature placement.
- Place the 2 rice paws at the very bottom of Pusheen’s face (they can even rest against the edge of the bento box), leaving a tiny space in between. To help them adhere better, insert a small piece of uncooked spaghetti into the back of each paw, and gently push them into the rice like you would a pushpin.
- Optional: Using tweezers, place the candy corn in between Pusheen’s paws, so it looks like she’s holding it.
- Optional: Using tweezers, apply edible gold stars randomly atop the the witch hat.
Notes
- If you want the nori facial features to stand out more against the grey rice, then here’s the trick: using the same nori punch that you used to cut out the nori facial features, cut out the facial features again from a slice of white cheese. Place the nori pieces on top of the matching cheese pieces, then apply them as you normally would to Pusheen’s face. This is what I did for this bento, and what a lot of bento artists do when dealing with darker rice colors.
- For a visual demonstration of how to shape each individual rice component (since I think this is much more helpful than written instructions), please refer to the Witch Pusheen video tutorial.

Share This Bento!
Spread the bento love to your friends & family ~